The Importance of Bulkheads

Bulkheads are essential to coastal infrastructure, protecting structures from flooding and preventing erosion of the shoreline. They are also important for residential properties in waterfront areas, adding value and enhancing aesthetics.

Bulkheads

In homes, bulkheads enclose space above cupboards, kitchen benches, and lounge windows, adding a recessed look and hiding ducting or air-conditioning units. They can be painted to match the décor or in a contrasting color. Visit https://dockbuildingcharleston.com/ for more information.

Bulkheads are vertical partition walls that subdivide the interior of ships into watertight compartments. They reduce the extent of seawater flooding in case of damage, and provide additional stiffness to hull girders. They can be flat or corrugated.

On ships, bulkheads help to isolate specific areas from the rest of the ship in the event of fires. This is useful because it means that a fire can be extinguished quickly without the risk of spreading elsewhere on board. The same is true for floods, which can also be contained within a single room isolated by a bulkhead.

However, the integrity of a bulkhead will only last for so long, and it is important that this is monitored. If signs of damage are identified, such as leaks or cracks, it is vital that these are promptly repaired. Otherwise, the bulkhead could fail and cause further problems.

In addition to providing protection against flooding, bulkheads can also be used to protect buildings. These barriers can be designed to meet specific requirements and are usually manufactured from materials such as concrete, steel or timber. They can be incorporated into building designs to create separate rooms or floors, as well as to reinforce existing structures.

These barriers can be built at a variety of heights and widths, depending on the particular needs of the customer. They can also be configured to provide multiple levels of protection, and are available in a range of colours. Research into materials, care in manufacturing and attention to aesthetics mean that bulkheads can be attractive and discreet, while still offering reliability and resistance.

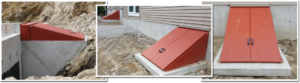
RAPID MODI is a high-performance stackable flood barrier that offers a combination of flexibility and security. Its modular design allows it to be installed quickly and easily, and its lightweight construction makes it easy to transport. Moreover, the barrier’s high-density polyethylene (PE) core provides maximum impact strength.

Many coastal communities face the challenge of protecting their properties from erosion and sea-level rise. While there are a number of different strategies, such as building seawalls and bulkheads, these structures must be maintained over the years to ensure that they remain effective. This is why it’s important to assess each property individually to determine what protection measures are necessary.

Preventing Erosion

Bulkheads are a good choice for coastal properties because they help prevent erosion. Coastal bulkheads are also known as seawalls or riprap revetments and are manmade structures built along shorelines to control beach erosion. They can be made from a variety of materials, including wood pilings, commercially developed vinyl products, large boulders stacked to form a wall or concrete.

A common bulkhead design is a series of interlocking panels. They are often reinforced by a berm of earth on the land side and by a series of soldier piles that support the waterside of the panels. These vertical support elements can be made from wood, concrete or steel and are used to hold the panels in place.

Depending on the material, bulkheads can last for years. Vinyl is known to last for up to 50 years, while pressure-treated wood and steel can withstand decades of harsh exposure. The type of bulkhead chosen will depend on a number of factors, including structural requirements, fire resistance and insulation capabilities.

A more detrimental type of bulkhead is a completely vertical structure that removes the area of transition between the land and water. Such structures are more common on residential properties in our gulf coast region and often contain harmful chemicals such as creosote that leech into the soil and water years after they have been constructed.

In addition, a totally vertical bulkhead reflects wave energy instead of dissipating it and can cause additional erosion in neighboring areas. It also takes a toll on submerged aquatic grasses that are critical for crabs, fish and other marine life. In contrast, a well-designed, properly maintained bulkhead will not only prevent erosion but will allow for the growth of vegetation and wildlife habitats.

When choosing a contractor to build or repair a bulkhead, ask for references and visit completed projects. Ask for an up-front cost estimate and make sure there are no hidden costs. Make sure the contractor is licensed and insured and can provide proof of adequate liability insurance coverage. Ask for proof of workers’ compensation coverage as well.

Aesthetics

A bulkhead isn’t a wall that just keeps a house or business standing tall, it can also offer quite a bit of aesthetic appeal. Many people choose to clad their bulkheads with different materials, including stone, wood, or vinyl to give them an extra touch of style.

Waterfront properties often benefit greatly from the added stability that bulkheads provide. They not only help keep the shoreline from eroding but make it safe for anyone that comes to visit via watercraft. Bulkheads can even be built to match docks for a cohesive aesthetic.

Bulkheads can be constructed from a variety of different materials, but steel is the most common due to its durability and ease of workability. Concrete is another popular choice, as it is very strong and can be formed into a number of shapes. Wood is also a common material, especially when it is treated to resist erosion and protect against wood-boring insects.

While they are commonly used to cover up things like pipes, wiring, and exhaust vents, bulkheads can offer a unique aesthetic as well. The curved or hemispherical shape of these walls can create an interesting contrast to ceilings and other geometric features in a room. They are particularly striking above chandeliers, as they draw the eye to the light fixture.

One of the most common uses for bulkheads is to conceal structural members, such as columns or beams. This gives a clean, finished look to a space, and also makes it easier to access electrical wiring and plumbing. In addition, a well-constructed bulkhead can protect these structures from damage caused by flooding or storms.

Another way to add beauty and style is to build a deck that looks over the bulkhead, or even extends above it. This offers a great opportunity to use materials that are durable and low-maintenance, such as vinyl. Vinyl lasts over 50 years, and it doesn’t absorb moisture or attract wood-boring insects. It can be shaped to fit the curve of your deck, and it comes in a variety of colors. It is a cost-effective option, as it costs less than wood or metal, and it requires less maintenance.

Maintenance

Bulkheads are an integral part of many industrial applications, from sealing below water deck shafts to oil rig containment. Marine construction companies rely on bulkheads to help control the flow of water around their projects for worker safety and project success. Bulkheads also make the job of maintaining and repairing a large-scale aquatic infrastructure project significantly easier.

One of the most common problems Bulkheads encounter is joint separation. Typically this is caused by uneven force of hydrostatic pressure on the panels and can be corrected with modern crack repair methods.

Another common problem is leaning bulkheads, which is caused by the tie-back rods deteriorating and weakening. This is a serious issue because it means that the concrete, walers and piles are no longer being held in place by the tie-back rods. It’s important to call a licensed professional for this type of bulkhead repair.

Finally, if you have a wood or vinyl bulkhead and you notice that it’s “leaning out,” this is an indication that some or all of the rods have rotted. This is a dangerous and expensive situation because if the bulkhead falls over you could lose valuable property.

This is why a bulkhead evaluation should be conducted by a licensed professional at least every two years, to determine the condition of the structure and plan for any repairs or maintenance needed. Performing regular evaluations and making minor repairs as recommended in the evaluation can extend the life of your bulkhead.

Bulkheads offer a lot of benefits to coastal property owners, whether they’re for commercial or residential use. They help protect land from erosion and can give you additional water depth right at the shoreline. They can even improve tidal flow and provide habitat for marine plants and forage fish (surf smelt and surf perch). And, of course, they provide peace of mind. But like any structure, they need routine maintenance to last and stay in good shape. If you have questions about your bulkhead or would like to schedule an evaluation, please contact us. We look forward to hearing from you!

Chimney Cleaning – Why You Should Hire a CSIA-Certified Chimney Sweep

A dirty chimney is a fire hazard that professionals should only clean and inspect. Hire Clean Chimney Sweep Charleston and ensure the fireplace is ready to be used again before the heating season begins in the fall. Before sweeping, tape plastic across the fireplace opening and close the damper. Also, prepare a ladder and cleaning tools like chimney brushes (long rods with bristles) and extension poles.

chimney sweep

When wood is burned, it releases both energy and unwanted byproducts. One of the most dangerous is creosote, a dark, tar-like substance that accumulates in chimneys over time due to incomplete combustion. When too much creosote builds up inside a chimney, it can cause serious issues that threaten the home’s and its inhabitants’ safety.

Chimneys can experience three stages of creosote buildup, which are degrees or levels. Stage 1 creosote is loose and flaky, allowing it to easily be removed by a chimney sweep with a brush or cleaning log. It is important to remove this creosote regularly to prevent it from progressing to stage two, which looks like black tar and is more difficult to remove than the previous stage.

Insufficient airflow and a fire that burns too fast can lead to incomplete combustion, which causes a buildup of loose and flaky creosote in the flue. This type of creosote is called first-degree buildup and can be easily removed by a professional chimney sweep with a brush or cleaning tool.

If not removed regularly, first-degree creosote can deteriorate to second-degree creosote, which is more solid than the loose flakes of stage 1. This thicker deposit may look like black tar and be harder to remove. It can also pose a more significant risk for chimney fires, so it is critical to address any signs of this type of creosote buildup as soon as possible.

If left unaddressed, second-degree creosote can further deteriorate to third-degree creosote. It is a hard, shiny, and tar-like deposit that is nearly impossible to remove. It can block a chimney completely, causing smoke and toxic gases to escape into the house. It can also damage a chimney lining and lead to a chimney fire.

It is important to note that while some chimney companies try to use scare tactics by demonstrating how much creosote has built up inside a chimney, this needs to be more accurate and could indicate a scam. If a chimney sweep uses terms like carbon monoxide poisoning or house fire to frighten you, get a second opinion or call another company.

Chimney fires are often caused by a buildup of creosote, a flammable residue that collects on the walls of a chimney flue liner and restricts airflow. It’s a dangerous byproduct of wood burning and is highly volatile, even when dampened. It can also cause cracks in the “fireproof” brick, stone, or clay chimney lining, allowing hot gases to reach combustible materials inside your home, such as wood framing, curtains, rugs, clothing, furniture, and other living areas.

During a chimney cleaning, a professional will use a tool that looks like a giant bottle brush with metal bristles on the top to scrape away the layer of creosote and other debris from the chimney lining. They will typically put down a drop cloth to protect floors and furnishings, a HEPA-rated vacuum for dust control, and masks for their protection. They start at the bottom of the chimney and work their way up, or they may begin on the roof and work their way down to ensure that all the accumulated creosote and other debris is scraped off the chimney.

While the chimney sweep works on your fireplace and chimney, they will carefully inspect it for any other potential hazards. They will look for any obstructions, such as animal nests, twigs, and branches that may have blown into the chimney from outside, and check for damaged or missing flue liners. Chimneys without chimney caps and poorly designed or placed caps are especially susceptible to windblown debris that can enter the flue and block the airflow.

Having your chimney cleaned before the colder weather and heating season arrives is one of the most important things you can do to protect your family, pets, and belongings. It’s a good idea to contact a CSIA-certified chimney sweep and schedule an appointment in the late spring or summer while the weather is still warm. This way, your chimney will be ready to use once the temperature drops in fall and winter.

Chimneys provide a complex system through which fire byproducts like smoke and carbon monoxide can safely exit the home. However, if the vent becomes clogged or damaged, it can prevent these harmful byproducts from going, leading to health hazards and even house fires. Regular maintenance and inspections can help keep the chimney functioning properly, but professional cleanings are often needed to remove creosote and other debris.

A dirty chimney can also reduce energy efficiency. The combustible byproducts of burning wood are vented through the chimney flue, but a buildup of soot and other debris can prevent them from exiting efficiently. As a result, the chimney may have to work harder to vent smoke and heat, which can lead to higher utility bills.

A professional chimney sweeper will survey and prepare the area before beginning the cleaning process. They will put down-drop cloths or plastic to protect your carpet and furnishings and use a high-powered HEPA-rated vacuum for dust control. They will also wear goggles and masks to ensure they don’t inhale any toxins created by the creosote. Depending on the size of your chimney and its condition, they may start their work from the flue, the roof, or both.

Once the chimney is clean, the sweep will inspect it again to determine whether any repairs are required. It is also important to hire a qualified professional, as working on the roof can be dangerous. A reputable sweep will be able to spot problems like cracks or leaks and repair them before they become serious issues.

In addition, a skilled chimney sweep can often spot problems outside your fireplace or chimney, but could still be costly. For example, if the damper is not sealing properly, cold air can rush into your home, increasing heating costs. A chimney sweep will be able to fill this gap to help improve your energy efficiency and save you money.

Chimney sweeps and other professionals use various tools to clean chimney flues. They also carry general liability and workers’ compensation insurance to protect themselves and their customers from unforeseen accidents. It is good to check their certification on the CSIA website and ask for references.

Protective eye protection and a dust mask or respirator are important regardless of how you clean your chimney. A stray piece of creosote or a rogue chimney fire can cause serious injury. It would be best to only climb on the roof with a sturdy ladder and proper safety equipment. A fall from a rooftop can paralyze or kill you.

If you plan to perform a chimney cleaning yourself, purchase a pulley rope system for the brush. The system consists of two ropes attached to the meeting, one on top and the other on the bottom. A person on the roof should hold one end of the rope while someone inside the fireplace lowers the other and pulls it up and down the chimney. This system allows one to clean the entire flue while standing on a ladder safely.

Ashes should be removed from the fireplace regularly to help prevent a creosote buildup and reduce the likelihood of a chimney fire. Removing them when cool is a good idea, as hot ashes can crack the chimney flue. Adding ashes to garden beds or soil improves moisture and helps the plants grow.

A chimney fire is a disaster that can destroy your home. It begins with snaps and pops that sound like gunshots, then progresses to a roaring fire. As the fire rages, it can melt through the flue and pour oily, flaming creosote into the fireplace and living rooms. The fire can also cause chimney and house damage from the resulting water flood.

The best way to avoid chimney fire is with regular maintenance by a professional. An examination and cleaning by a certified chimney sweep will ensure that your chimney and flue are safe for fires and smoke.

The Importance of Siding Repair

Siding repair is one of the best ways to increase your home’s value and protect it from moisture. Moisture that penetrates your siding can lead to rot, mold, and other structural problems.

Siding Repair

Damaged areas may need everything from small patching to board replacements. Luckily, a qualified contractor like Charleston Advanced Siding Repair can make it easy to determine whether repair or replacement is right.

Damaged siding can be an eyesore and leave your home exposed to moisture, mold, and insects. It is important to address any damage as soon as possible to prevent further problems and to protect the integrity of the underlying structure of your home. Siding repairs are easy to do with some basic tools and materials.

Inspect for Mold and Moisture

Before you start repairing your damaged siding, it is important to clear the area around the damaged section and remove any obstructions such as plants or toys. This will allow you to work safely and efficiently while avoiding any accidents or unnecessary damage. It is also a good idea to inspect the area behind the damaged siding for signs of mold or moisture, which can cause further damage to your new siding if not addressed immediately.

Replacing a piece of wood siding is a relatively simple DIY project that shouldn’t take more than an hour for most homeowners. Before starting, make sure you have the proper tools and supplies such as a ladder, a hammer and a pry bar. Clear the area by driving wedges under each damaged shingle or clapboard to loosen it, then pull out or cut off any nails that are holding it in place. Once the old clapboard or shingle is removed, insert the replacement and nail it into place with 16d aluminum nails. If the nail holes are a little larger than the replacement, drill pilot holes to prevent the wood from splitting.

Using the old piece as a guide, measure and mark your cut line on the new panel. Remember to stagger the butt joints if you are replacing multiple courses of siding. Also, consider using cement fiberboard instead of wood to help prevent rotting. Once you have the piece of siding cut, use a jigsaw to cut out vent, window and power outlet openings.

Holes are a major issue and should be repaired as quickly as possible. They provide entry points for water, pests and rodents that can further damage your siding and the underlying structure of your house.

Repainting the Siding

Few features of a home make an instant impact like a fresh coat of paint. It can also be an effective way to protect your home from damage, such as mold, mildew and rot. Wood siding generally requires repainting every 3-5 years to maintain its appearance and prevent deterioration. Whether your siding is damaged or simply faded, it is important to repaint the entire surface to restore its beauty and protect the integrity of the wood beneath.

If you have small divots or holes in your vinyl siding, it may be possible to fill them with caulk that matches the color of the vinyl. For larger holes, you will need to use a patch. The best option is to purchase a patch that is designed specifically for vinyl siding. You will need to clean the area where the patch is going to be applied to create a smooth surface that is easy to paint over. Once the patch is dry, you will need to apply a bead of caulk around the edges to ensure that the hole will not leak.

When painting vinyl siding, it is essential to use a high quality latex urethane paint that will flex with the expansion and contraction of vinyl throughout the year. It is also recommended to prime the surface before applying the paint, especially if it has been exposed to a lot of sun or moisture. You should also choose a light color, as darker colors will attract heat and may cause the vinyl to deteriorate faster.

If you are having a large section of your siding replaced, it is a good idea to prepare the area by clearing a path for the crew and protecting any belongings that will be in the work zone. Be sure to mow the lawn and trim hedges, and remove any pictures or other decorations from your exterior walls. It is important that the crew can easily access the siding and caulking areas, so it is also recommended to take down anything from the gutters or downspouts that will be in their way.

Building Paper Under the Siding

Siding does more than just enhance the aesthetic of your home; it protects the interior from moisture and insects. As such, it’s important to keep your siding in top shape so that it can continue doing its job. When holes, cracks or dents occur, they leave the siding exposed to moisture and insects and may also cause further damage, which can add up over time. Holes and cracks are the most obvious signs that your siding needs repair, but a closer look may reveal other problems as well, such as water damage or warping.

Fortunately, most types of siding can be repaired with relative ease, although the size and location of the damage will influence total cost. Typically, a small hole will cost around $100 to $150 to patch. Dents and loose siding can also be repaired for about the same price, while rot, mold, mildew, and water damage require more extensive work and should be fixed by a professional contractor.

If you have vinyl siding, it’s best to patch a small hole as soon as possible to prevent water from seeping behind the panel and causing further damage. If you don’t have replacement panels, use high-quality vinyl patching material. Before applying the filler, however, you’ll need to clean the surface and de-gloss it with a plastic putty knife and 220-grit sandpaper. Then, once the hole is filled, you can apply caulking to seal it and paint to match the existing color.

You should be aware, though, that this method of repairing siding is only a temporary fix. It is not recommended that you allow moisture to get behind the vinyl because it can lead to serious structural problems and rot that may require the replacement of the entire home’s siding.

In the event that your siding has significant rot, mold or mildew, you’ll need to remove it and replace it entirely. This is more labor-intensive and expensive, but it’s the only way to ensure that your siding will be protected against further damage and rot.

Choosing a Contractor

A re-siding job is an expensive proposition. Make sure that you work with a contractor who will not only deliver quality results, but also communicate clearly and keep the site clean, safe and neat during the entire process. If you’re not comfortable with the way a potential contractor works, it may be best to continue looking for someone else.

A reliable contractor should be able to provide you with an accurate estimate for the cost of your siding repair project before they start working. This should include all labor, materials and any other incidentals that might come up during the remodeling process. Ask them to include a breakdown of the estimate and what is covered and not included so that there are no surprises when you receive your bill.

Siding contractors who are reputable will have no problem providing you with referrals and examples of past projects they’ve worked on. These are great ways to assess the quality of their workmanship and if their aesthetic preferences match up with your own.

Another important question to ask is whether or not they have liability insurance. If they don’t, that should be a red flag because if an employee were to get hurt on your property during installation or any other phase of the project, you would be held liable because it occurred on your land.

Many professional siding contractors will carry liability coverage, so don’t be surprised if they answer in the affirmative. They will probably then give you a copy of their insurance policy, which should detail their coverage and any exclusions.

When choosing a siding contractor, be sure to inquire about their warranty on their work and the materials they use. This will give you peace of mind and ensure that any problems you encounter are addressed promptly and efficiently.

A trustworthy contractor can also explain the difference between repairs and complete siding replacement. They will know the benefits of each and how to help you choose the right option for your home. They should also be able to explain what added products, like insulation, are available and how they can enhance your home’s appearance, performance, and energy efficiency.